The Kernel#
The kernel is the heart of the Linux operating system. It’s the software that takes the low-level requests, such as reading or writing files, or reading and writing general-purpose input/output (GPIO) pins, and maps them to the hardware. When you install a new version of the OS (Verifying You Have the Latest Version of the OS on Your Bone), you get a certain version of the kernel.
You usually won’t need to mess with the kernel, but sometimes you might want to try something new that requires a different kernel. This chapter shows how to switch kernels. The nice thing is you can have multiple kernels on your system at the same time and select from among them which to boot up.
Updating the Kernel#
Problem#
You have an out-of-date kernel and want to make it current.
Solution#
Use the following command to determine which kernel you are running:
bone$ uname -a
Linux beaglebone 5.10.168-ti-r62 #1bullseye SMP PREEMPT Tue May 23 20:15:00 UTC 2023 armv7l GNU/Linux
GNU/Linux
The 5.10.168-ti-r62 string is the kernel version.
To update to the current kernel, ensure that your Bone is on the Internet (Sharing the Host’s Internet Connection over USB or Establishing an Ethernet-Based Internet Connection) and then run the following commands:
bone$ apt-cache pkgnames | grep linux-image | sort | less
...
linux-image-5.10.162-ti-r59
linux-image-5.10.162-ti-rt-r56
linux-image-5.10.162-ti-rt-r57
linux-image-5.10.162-ti-rt-r58
linux-image-5.10.162-ti-rt-r59
linux-image-5.10.168-armv7-lpae-x71
linux-image-5.10.168-armv7-rt-x71
linux-image-5.10.168-armv7-x71
linux-image-5.10.168-bone71
linux-image-5.10.168-bone-rt-r71
linux-image-5.10.168-ti-r60
linux-image-5.10.168-ti-r61
linux-image-5.10.168-ti-r62
linux-image-5.10.168-ti-rt-r60
linux-image-5.10.168-ti-rt-r61
linux-image-5.10.168-ti-rt-r62
...

bone$ sudo apt install linux-image-5.10.162-ti-rt-r59
bone$ sudo reboot

bone$ uname -a
Linux beaglebone 5.10.162-ti-rt-r59 #1 SMP PREEMPT Wed Nov 19 21:11:08 UTC 2014 armv7l
GNU/Linux
The first command lists the versions of the kernel that are available. The second command installs one. After you have rebooted, the new kernel will be running.
If the current kernel is doing its job adequately, you probably don’t need to update, but sometimes a new software package requires a more up-to-date kernel. Fortunately, precompiled kernels are available and ready to download.
Seeing which kernels are installed#
You can have multiple kernels install at the same time. T hey are saved in /boot
bone$ cd /boot
bone$ ls
config-5.10.168-ti-r62      initrd.img-5.10.168-ti-r63  uboot                    vmlinuz-5.10.168-ti-r63
config-5.10.168-ti-r63      SOC.sh                      uEnv.txt
dtbs                        System.map-5.10.168-ti-r62  uEnv.txt.orig
initrd.img-5.10.168-ti-r62  System.map-5.10.168-ti-r63  vmlinuz-5.10.168-ti-r62
Here I have two kernel versions installed.
On the Bone (Not the Play) the file uEnv.txt tells which kernel to use on the next reboot. Here are the first few lines:
Line
1 #Docs: http://elinux.org/Beagleboard:U-boot_partitioning_layout_2.0
2
3 # uname_r=4.14.108-ti-r137
4 uname_r=4.19.94-ti-r50
5 # uname_r=5.4.52-ti-r17
6 #uuid=
Lines 3-5 list the various kernels, and the uncommented one on line 4 is the one that will be used next time. You will have to add your own uname’s. Get the names from the files in /boot. Be careful, if you mistype the name your Bone won’t boot.
On the Play you can see which version of the kernel will boot next by:
play$ cat /boot/firmware/kversion
5.10.168-ti-arm64-r106
If you want to change the version run:
bone$ sudo apt install linux-image-5.10.168-ti-arm64-r105 --reinstall
Building and Installing Kernel Modules#
Problem#
You need to use a peripheral for which there currently is no driver, or you need to improve the performance of an interface previously handled in user space.
Solution#
The solution is to run in kernel space by building a kernel module. There are entire books on writing Linux Device Drivers. This recipe assumes that the driver has already been written and shows how to compile and install it. After you’ve followed the steps for this simple module, you will be able to apply them to any other module.
For our example module, add the code in Simple Kernel Module (hello.c) to a file called hello.c.
 1#include <linux/module.h>       /* Needed by all modules */
 2#include <linux/kernel.h>       /* Needed for KERN_INFO */
 3#include <linux/init.h>         /* Needed for the macros */
 4
 5static int __init hello_start(void)
 6{
 7    printk(KERN_INFO "Loading hello module...\n");
 8    printk(KERN_INFO "Hello, World!\n");
 9    return 0;
10}
11
12static void __exit hello_end(void)
13{
14    printk(KERN_INFO "Goodbye Boris\n");
15}
16
17module_init(hello_start);
18module_exit(hello_end);
19
20MODULE_AUTHOR("Boris Houndleroy");
21MODULE_DESCRIPTION("Hello World Example");
22MODULE_LICENSE("GPL");
When compiling on the Bone, all you need to do is load the Kernel Headers for the version of the kernel you’re running:
bone$ sudo apt install linux-headers-`uname -r`
Note
The quotes around uname -r are backtick characters. On a United States keyboard,
the backtick key is to the left of the 1 key.
This took a little more than three minutes on my Bone. The uname -r part of the command
looks up what version of the kernel you are running and loads the headers for it.
Note
If you don’t have a network connection you can get the headers from the running kernel with the following.
sudo modprobe kheaders
rm -rf $HOME/headers
mkdir -p $HOME/headers
tar -xvf /sys/kernel/kheaders.tar.xz -C $HOME/headers > /dev/null
cd my-kernel-module
make -C $HOME/headers M=$(pwd) modules
sudo rmmod kheaders
The modprobe kheaders makes the /sys/kernel/kheaders.tar.xz appear.
Next, add the code in Simple Kernel Module (Makefile) to a file called Makefile.
1obj-m := hello.o
2KDIR  := /lib/modules/$(shell uname -r)/build
3
4all:
5<TAB>make -C $(KDIR) M=$$PWD
6
7clean:
8<TAB>rm hello.mod.c hello.o modules.order hello.mod.o Module.symvers
Note
Replace the two instances of <TAB> with a tab character (the key left of the Q key on a United States keyboard). The tab characters are very important to makefiles and must appear as shown.
Now, compile the kernel module by using the make command:
bone$ make
make -C /lib/modules/5.10.168-ti-r62/build M=$PWD
make[1]: Entering directory '/usr/src/linux-headers-5.10.168-ti-r62'
CC [M]  /home/debian/docs.beagleboard.io/books/beaglebone-cookbook/code/07kernel/hello.o
MODPOST /home/debian/docs.beagleboard.io/books/beaglebone-cookbook/code/07kernel/Module.symvers
CC [M]  /home/debian/docs.beagleboard.io/books/beaglebone-cookbook/code/07kernel/hello.mod.o
LD [M]  /home/debian/host/BeagleBoard/docs.beagleboard.io/books/beaglebone-cookbook/code/07kernel/hello.ko
make[1]: Leaving directory '/usr/src/linux-headers-5.10.168-ti-r62'

bone$ ls
Makefile        hello.c   hello.mod.c  hello.o
Module.symvers  hello.ko  hello.mod.o  modules.order
Notice that several files have been created.
hello.ko is the one you want. Try a couple of commands with it:
bone$ modinfo hello.ko
filename:       /home/debian/host/BeagleBoard/docs.beagleboard.io/books/beaglebone-cookbook/code/07kernel/hello.ko
license:        GPL
description:    Hello World Example
author:         Boris Houndleroy
depends:
name:           hello
vermagic:       5.10.168-ti-r62 SMP preempt mod_unload modversions ARMv7 p2v8

bone$ sudo insmod hello.ko
bone$ dmesg | tail -4
[  377.944777] lm75 1-004a: hwmon1: sensor 'tmp101'
[  377.944976] i2c i2c-1: new_device: Instantiated device tmp101 at 0x4a
[85819.772666] Loading hello module...
[85819.772687] Hello, World!
The first command displays information about the module. The insmod command inserts the module into the running kernel. If all goes well, nothing is displayed, but the module does print something in the kernel log. The dmesg command displays the messages in the log, and the tail -4 command shows the last four messages. The last two messages are from the module. It worked!
Compiling the Kernel#
Problem#
You need to download, patch, and compile the kernel from its source code.
Solution#
This is easier than it sounds, thanks to some very powerful scripts.
Warning
Be sure to run this recipe on your host computer. The Bone has enough computational power to compile a module or two, but compiling the entire kernel takes lots of time and resources.
Downloading and Compiling the Kernel#
To download and compile the kernel, follow these steps:
host$ git clone https://git.beagleboard.org/RobertCNelson/ti-linux-kernel-dev # ①
host$ cd ti-linux-kernel-dev
host$ git checkout ti-linux-5.10.y # ②
host$ ./build_deb.sh # ③
Note
If you are using a 64 bit Bone, git checkout ti-linux-arm64-5.10.y
① The first command clones a repository with the tools to build the kernel for the Bone.
② When you know which kernel to try, use git checkout to check it out. This command checks out branch ti-linux-5.10.y.
③ build_deb.sh is the master builder. If needed, it will download the cross compilers
needed to compile the kernel (gcc is the current cross compiler).
If there is a kernel at ~/linux-dev, it will use it; otherwise,
it will download a copy to ti-linux-kernel-dev/ignore/linux-src.
It will then patch the kernel so that it will run on the Bone.
Note
build_deb.sh may ask you to install additional files. Just run sudo apt install *files* to install them.
After the kernel is patched, you’ll see a screen similar to Kernel configuration menu, on which you can configure the kernel.
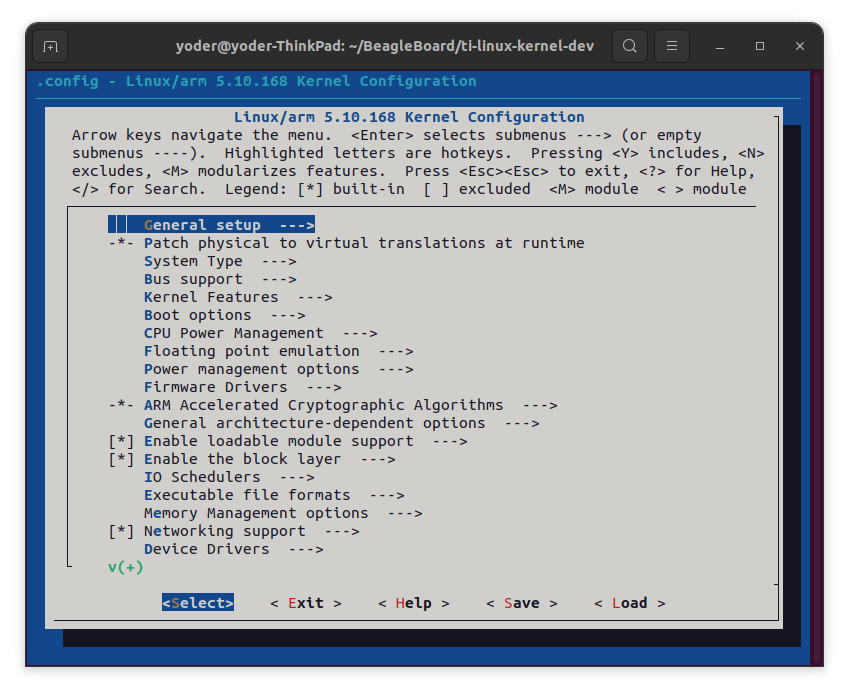
Fig. 703 Kernel configuration menu#
You can use the arrow keys to navigate. No changes need to be made, so you can just press the right arrow and Enter to start the kernel compiling. The entire process took about 25 minutes on my 8-core host.
The ti-linux-kernel-dev/KERNEL directory contains the source code for the kernel. The ti-linux-kernel-dev/deploy
directory contains the compiled kernel and the files needed to run it.
Installing the Kernel on the Bone#
The ./build_deb.sh script creates a single .deb file that contains all the files needed for the new kernel. You find it here:
host$ cd ti-linux-kernel-dev/deploy
host$ ls -sh
total 40M
7.7M linux-headers-5.10.168-ti-r62_1xross_armhf.deb  8.0K linux-upstream_1xross_armhf.buildinfo
 33M linux-image-5.10.168-ti-r62_1xross_armhf.deb    4.0K linux-upstream_1xross_armhf.changes
1.1M linux-libc-dev_1xross_armhf.deb
The linux-image- file is the one we want. It contains over 3000 files.
host$ dpkg -c linux-image-5.10.168-ti-r62_1xross_armhf.deb | wc
   3251   19506  379250
The dpkg command lists all the files in the .deb file and the wc counts all the lines in the output. You can see those files with:
host$ dpkg -c linux-image-5.10.168-ti-r62_1xross_armhf.deb | less
drwxr-xr-x root/root         0 2023-06-12 12:57 ./
drwxr-xr-x root/root         0 2023-06-12 12:57 ./boot/
-rw-r--r-- root/root   4763113 2023-06-12 12:57 ./boot/System.map-5.10.168-ti-r62
-rw-r--r-- root/root    191331 2023-06-12 12:57 ./boot/config-5.10.168-ti-r62
drwxr-xr-x root/root         0 2023-06-12 12:57 ./boot/dtbs/
drwxr-xr-x root/root         0 2023-06-12 12:57 ./boot/dtbs/5.10.168-ti-r62/
-rwxr-xr-x root/root     90644 2023-06-12 12:57 ./boot/dtbs/5.10.168-ti-r62/am335x-baltos-ir2110.dtb
-rwxr-xr-x root/root     91362 2023-06-12 12:57 ./boot/dtbs/5.10.168-ti-r62/am335x-baltos-ir3220.dtb
-rwxr-xr-x root/root     91633 2023-06-12 12:57 ./boot/dtbs/5.10.168-ti-r62/am335x-baltos-ir5221.dtb
-rwxr-xr-x root/root     88684 2023-06-12 12:57 ./boot/dtbs/5.10.168-ti-r62/am335x-base0033.dtb
You can see it’s putting things in the /boot directory.
Note: You can also look into the other two .deb files and see what they install.
Move the linux-image- file to your Bone.
host$ scp linux-image-5.10.168-ti-r62_1xross_armhf.deb bone:.
You might have to use debian@192.168.7.2 for bone if you haven’t set everything up.
Now ssh to the bone.
host$ ssh bone
bone$ ls -sh
bin  exercises linux-image-5.10.168-ti-r62_1xross_armhf.deb
Now install it.
bone$ sudo dpkg --install linux-image-5.10.168-ti-r62_1xross_armhf.deb
Wait a while. (Mine took almore 2 minutes.) Once done check /boot.
bone$ ls -sh /boot
total 40M
160K config-4.19.94-ti-r50        4.0K SOC.sh                     4.0K uEnv.txt.orig
180K config-5.10.168-ti-r62       3.5M System.map-4.19.94-ti-r50  9.7M vmlinuz-4.19.94-ti-r50
4.0K dtbs                         4.1M System.map-5.10.168-ti-r62 8.6M vmlinuz-5.10.168-ti-r62
6.4M initrd.img-4.19.94-ti-r50    4.0K uboot
6.8M initrd.img-5.10.168-ti-r62   4.0K uEnv.txt
You see the new kernel files along with the old files. Check uEnv.txt.
bone$ head /boot/uEnv.txt
#Docs: http://elinux.org/Beagleboard:U-boot_partitioning_layout_2.0
# uname_r=4.19.94-ti-r50
uname_r=5.10.168-ti-r62
I added the commented out uname_r line to make it easy to switch between versions of the kernel.
Reboot and test out the new kernel.
bone$ sudo reboot
Installin a Cross Compiler#
Problem#
You want to compile on your host computer and run on the Beagle.
Solution#
Run the following:
host$ sudo apt install gcc-arm-linux-gnueabihf
host$ sudo apt install gcc-aarch64-linux-gnu
Note
From now on use arm if you are using a 32-bit machine and aarch64 if you are using a 64-bit machine.
This installs a cross compiler, but you need to set up a couple of things so that it can be found. At the command prompt, enter arm-<TAB><TAB> to see what was installed.
host$ arm-<TAB><TAB>
arm-linux-gnueabihf-addr2line      arm-linux-gnueabihf-gcc-nm         arm-linux-gnueabihf-ld.bfd
arm-linux-gnueabihf-ar             arm-linux-gnueabihf-gcc-nm-11      arm-linux-gnueabihf-ld.gold
arm-linux-gnueabihf-as             arm-linux-gnueabihf-gcc-ranlib     arm-linux-gnueabihf-lto-dump-11
arm-linux-gnueabihf-c++filt        arm-linux-gnueabihf-gcc-ranlib-11  arm-linux-gnueabihf-nm
arm-linux-gnueabihf-cpp            arm-linux-gnueabihf-gcov           arm-linux-gnueabihf-objcopy
arm-linux-gnueabihf-cpp-11         arm-linux-gnueabihf-gcov-11        arm-linux-gnueabihf-objdump
arm-linux-gnueabihf-dwp            arm-linux-gnueabihf-gcov-dump      arm-linux-gnueabihf-ranlib
arm-linux-gnueabihf-elfedit        arm-linux-gnueabihf-gcov-dump-11   arm-linux-gnueabihf-readelf
arm-linux-gnueabihf-gcc            arm-linux-gnueabihf-gcov-tool      arm-linux-gnueabihf-size
arm-linux-gnueabihf-gcc-11         arm-linux-gnueabihf-gcov-tool-11   arm-linux-gnueabihf-strings
arm-linux-gnueabihf-gcc-ar         arm-linux-gnueabihf-gprof          arm-linux-gnueabihf-strip
arm-linux-gnueabihf-gcc-ar-11      arm-linux-gnueabihf-ld
What you see are all the cross-development tools.
Setting Up Variables#
Now, set up a couple of variables to know which compiler you are using:
host$ export ARCH=arm
host$ export CROSS_COMPILE=arm-linux-gnueabihf-
These lines set up the standard environmental variables so that you can determine which cross-development tools to use. Test the cross compiler by adding Simple helloWorld.c to test cross compiling (helloWorld.c) to a file named _helloWorld.c_.
1#include <stdio.h>
2
3int main(int argc, char **argv) {
4  printf("Hello, World! \n");
5}
You can then cross-compile by using the following commands:
host$ ${CROSS_COMPILE}gcc helloWorld.c
host$ file a.out
a.out: ELF 32-bit LSB executable, ARM, version 1 (SYSV),
dynamically linked (uses shared libs), for GNU/Linux 2.6.31,
BuildID[sha1]=0x10182364352b9f3cb15d1aa61395aeede11a52ad, not stripped
The file command shows that a.out was compiled for an ARM processor.
Applying Patches#
Problem#
You have a patch file that you need to apply to the kernel.
Solution#
Simple kernel patch file (hello.patch) shows a patch file that you can use on the kernel.
 1From eaf4f7ea7d540bc8bb57283a8f68321ddb4401f4 Mon Sep 17 00:00:00 2001
 2From: Jason Kridner <jdk@ti.com>
 3Date: Tue, 12 Feb 2013 02:18:03 +0000
 4Subject: [PATCH] hello: example kernel modules
 5
 6---
 7 hello/Makefile   |    7 +++++++
 8 hello/hello.c    |   18 ++++++++++++++++++
 9 2 files changed, 25 insertions(+), 0 deletions(-)
10 create mode 100644 hello/Makefile
11 create mode 100644 hello/hello.c
12
13diff --git a/hello/Makefile b/hello/Makefile
14new file mode 100644
15index 0000000..4b23da7
16--- /dev/null
17+++ b/hello/Makefile
18@@ -0,0 +1,7 @@
19+obj-m := hello.o
20+
21+PWD   := $(shell pwd)
22+KDIR  := ${PWD}/..
23+
24+default:
25+	make -C $(KDIR) SUBDIRS=$(PWD) modules
26diff --git a/hello/hello.c b/hello/hello.c
27new file mode 100644
28index 0000000..157d490
29--- /dev/null
30+++ b/hello/hello.c
31@@ -0,0 +1,22 @@
32+#include <linux/module.h>       /* Needed by all modules */
33+#include <linux/kernel.h>       /* Needed for KERN_INFO */
34+#include <linux/init.h>         /* Needed for the macros */
35+
36+static int __init hello_start(void)
37+{
38+    printk(KERN_INFO "Loading hello module...\n");
39+    printk(KERN_INFO "Hello, World!\n");
40+    return 0;
41+}
42+
43+static void __exit hello_end(void)
44+{
45+    printk(KERN_INFO "Goodbye Boris\n");
46+}
47+
48+module_init(hello_start);
49+module_exit(hello_end);
50+
51+MODULE_AUTHOR("Boris Houndleroy");
52+MODULE_DESCRIPTION("Hello World Example");
53+MODULE_LICENSE("GPL");
Here’s how to use it:
Install the kernel sources (Compiling the Kernel).
Change to the kernel directory (+cd ti-linux-kernel-dev/KERNEL+).
Add Simple kernel patch file (hello.patch) to a file named
hello.patchin theti-linux-kernel-dev/KERNELdirectory.Run the following commands:
host$ cd ti-linux-kernel-dev/KERNEL
host$ patch -p1 < hello.patch
patching file hello/Makefile
patching file hello/hello.c
The output of the patch command apprises you of what it’s doing.
Look in the hello directory to see what was created:
host$ cd hello
host$ ls
hello.c  Makefile
Building and Installing Kernel Modules shows how to build and install a module, and Creating Your Own Patch File shows how to create your own patch file.
Creating Your Own Patch File#
Problem#
You made a few changes to the kernel, and you want to share them with your friends.
Solution#
Create a patch file that contains just the changes you have made. Before making your changes, check out a new branch:
host$ cd ti-linux-kernel-dev/KERNEL
host$ git status
# On branch master
nothing to commit (working directory clean)
Good, so far no changes have been made. Now, create a new branch:
host$ git checkout -b hello1
host$ git status
# On branch hello1
nothing to commit (working directory clean)
You’ve created a new branch called hello1 and checked it out. Now, make whatever changes
to the kernel you want. I did some work with a simple character driver that we can use as an example:
host$ cd ti-linux-kernel-dev/KERNEL/drivers/char/
host$ git status
# On branch hello1
# Changes not staged for commit:
#   (use "git add file..." to update what will be committed)
#   (use "git checkout -- file..." to discard changes in working directory)
#
#   modified:   Kconfig
#   modified:   Makefile
#
# Untracked files:
#   (use "git add file..." to include in what will be committed)
#
#   examples/
no changes added to commit (use "git add" and/or "git commit -a")
Add the files that were created and commit them:
host$ git add Kconfig Makefile examples
host$ git status
# On branch hello1
# Changes to be committed:
#   (use "git reset HEAD file..." to unstage)
#
#   modified:   Kconfig
#   modified:   Makefile
#   new file:   examples/Makefile
#   new file:   examples/hello1.c
#
host$ git commit -m "Files for hello1 kernel module"
[hello1 99346d5] Files for hello1 kernel module
4 files changed, 33 insertions(+)
create mode 100644 drivers/char/examples/Makefile
create mode 100644 drivers/char/examples/hello1.c
Finally, create the patch file:
host$ git format-patch master --stdout > hello1.patch