Using Arduino Zephyr Template#
The Arduino Core API module for zephyr leverages the power of Zephyr under an Arduino-C++ style abstraction layer thus helping zephyr new-comers to start using it without worrying about learning new APIs and libraries.
Using this template you can run arduino code on your BeagleConnect Freedom.
Pin Numbering For BeagleConnect Freedom#
You will see pins over Mikrobus-1 and Mikrobus-2 that can be used for Arduino code.
You can set each pin to either read signals (input) for things like buttons &
sensors or you can set them to send signals (output) to things like LEDs and motors. This lets you
interact with and control the physical world using Arduino code on BeagleConnect
Freedom board.
Commonly used GPIOs are specified:
D0-D18 Digital GPIO pins
A0-A5 ADC GPIO pins
D2 and D6 PWM GPIO pins
Reference to all GPIO pins are shown in the below images.
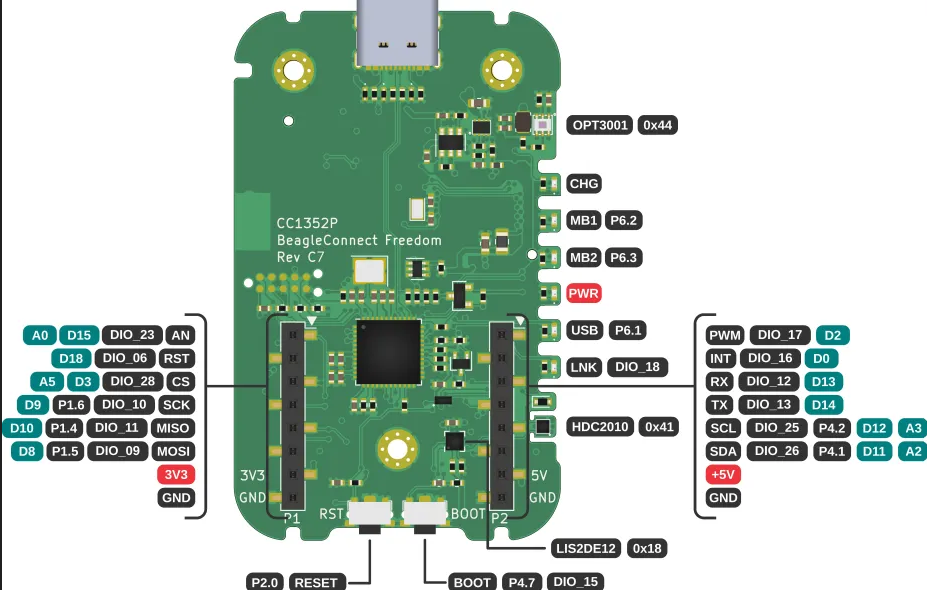
Fig. 625 Mikrobus-1 front annotated arduino pinout#
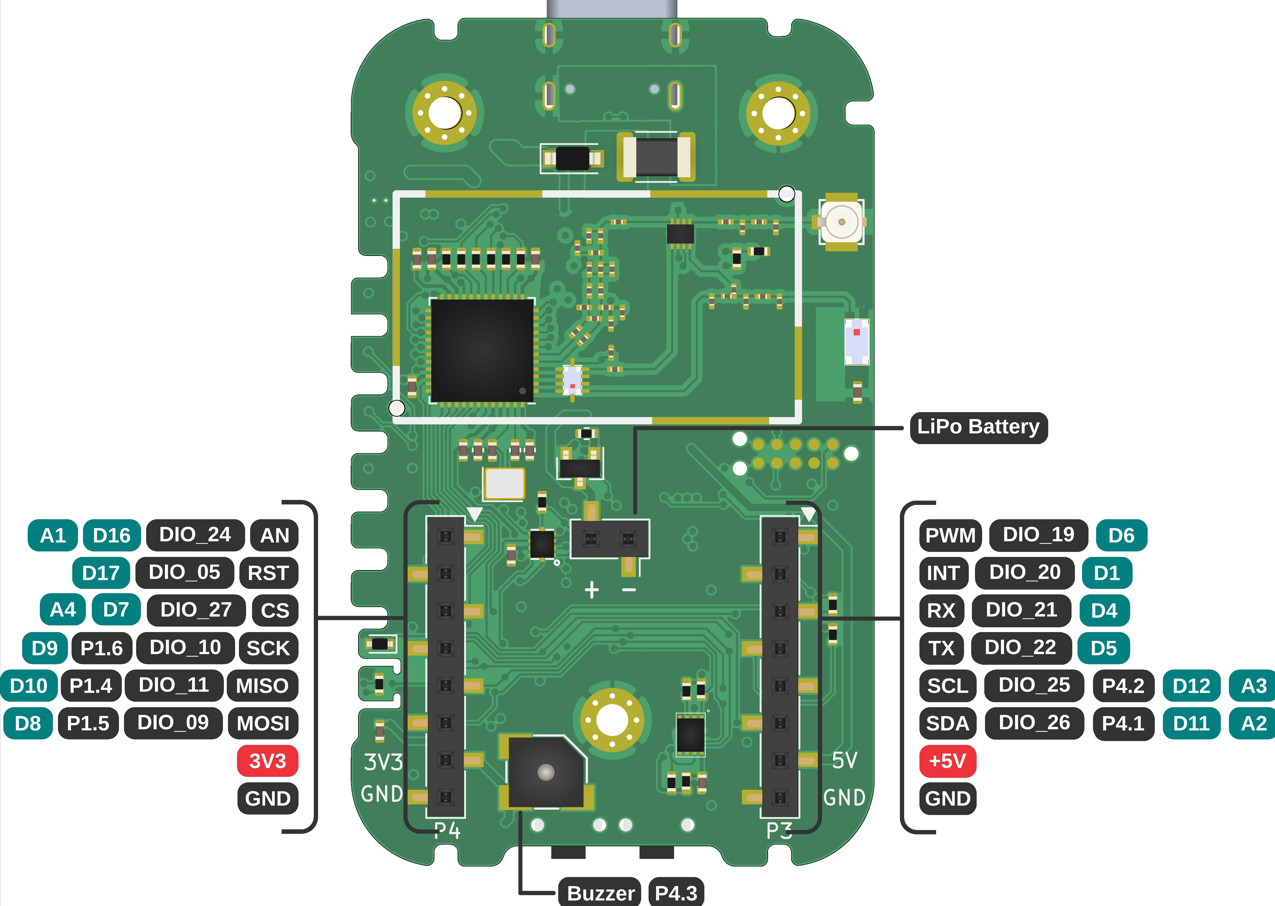
Fig. 626 Mikrobus-2 back annotated arduino pinout#
Setup Arduino workspace#
If this is your first time using zephyr, Install Zephyr SDK and install cc1352-flasher
using command pip install cc1352-flasher then reboot your system before following the steps below.
Create a workspace folder:
mkdir arduino-workspace
cd arduino-workspace
Setup virtual environment
python -m venv .venv
source .venv/bin/activate
pip install west
Setup Zephyr app:
west init -m https://openbeagle.org/beagleconnect/arduino-zephyr-template .
west update
Setup Arduino module
ln -srf modules/lib/ArduinoCore-API/api modules/lib/Arduino-Zephyr-API/cores/arduino/.
Install python deps
pip install -r zephyr/scripts/requirements-base.txt
Arduino Code#
You can find main.cpp file in the directory arduino-workspace/arduino-zephyr-template/src/
which contains your arduino code. The default code prints Hello World on the serial monitor.
Since you are already in the arduino-workspace directory, then proceed with writing the following code.
nano arduino-zephyr-template/src/main.cpp
#include <Arduino.h>

void setup() {
    Serial.begin(115200);
}

void loop() {
    Serial.println("Hello World");
    delay(5000);
}
Press CTRL+O and ENTER to save, CTRL+X to exit.
Important
You must start your main.cpp code with #include <Arduino.h>.
Build the Arduino directory#
Before flashing, run the command below to build the arduino-zephyr-template for the board
beagleconnect_freedom.
west build -b beagleconnect_freedom arduino-zephyr-template -p
Note
Only if you are following the steps from the beginning then the above command will work.
Otherwise, make sure that you are in the arduino-workspace directory and setup
virtual environment using command source .venv/bin/activate.
Flash BeagleConnect Freedom#
Make sure that your BeagleConnect Freedom is connected with your linux system via USB.
west flash
Serial Output#
Considering your BeagleConnect Freedom is connected to /dev/ttyACM0 you can see the serial output coming from your BeagleConnect Freedom.
tio /dev/ttyACM0
Arduino blink code running on BeagleConnect Freedom#
For BeagleConnect Freedom LNK LED will work as LED_BUILTIN in Arduino code.
First you have to modify main.cpp located in the directory arduino-workspace/arduino-zephyr-template/src/
created at the time of setup.
#include <Arduino.h>

void setup() {
// initialize digital pin LED_BUILTIN as an output.
pinMode(LED_BUILTIN, OUTPUT);
}

// the loop function runs over and over again forever
void loop() {
digitalWrite(LED_BUILTIN, HIGH);  // turn the LED on (HIGH is the voltage level)
delay(1000);                      // wait for a second
digitalWrite(LED_BUILTIN, LOW);   // turn the LED off by making the voltage LOW
delay(1000);                      // wait for a second
}
Note
For specifying high and low output states, use HIGH and LOW. Avoid using boolean 1 and 0 as they may not be compatible.
Before doing Build and Flash, you must activate the virtual environment in the arduino-workspace directory which has been created earlier.
source .venv/bin/activate
Now, execute the build command.
west build -b beagleconnect_freedom arduino-zephyr-template -p
Make sure your BeagleConnect Freedom is connected to your linux system via USB.
Finally, flash using the command below. The LNK LED of BeagleConnect will start blinking after flashing
is complete.
west flash
Tip
You can try more Arduino examples on BeagleConnect Freedom.
